Last year, the Dynamo in Forma Beta extension first brought Dynamo automation capabilities into Forma. Today, we are proud to announce the closed beta of Dynamo as a service, a next-level Forma cloud integration that unlocks more seamless, efficient, and enhanced capabilities for all users, with no need to install anything or even know about Dynamo. You can sign up for a chance to take part in this invite-only beta via this link: https://feedback.autodesk.com/key/DynamoForma.
In this blog post, we’ll look back at the original beta extension, delve into details about the Dynamo service integration with Forma, and explore powerful new features that expand your design capabilities. Get ready for a truly integrated Dynamo/Forma experience.
What is Autodesk Forma?
Autodesk Forma is a cloud software that offers powerful, yet easy-to-use AI-powered tools for pre-design and schematic design. Architects and designers use Forma to model complex 3D designs in minutes, optimize living quality and sustainability through real-time environmental analysis, and continue the design process by fluidly connecting with Revit, Rhino, and Dynamo. You can learn more and start your free trial or purchase here: Autodesk Forma. Forma is included as part of the AEC Collection.
A look back: Where we’ve been
The release of Dynamo in Forma Beta in November 2023 powered a variety of design automation capabilities in Forma through Dynamo Player. Accessed through a Dynamo package, Dynamo Player was an extension that connected Forma to Dynamo desktop for graph execution. It allowed users to leverage Dynamo’s functionality inside Forma in a simplified way with a friendly user interface.
While the promise of this meant that you could share tools with your colleagues who didn’t know much about the visual programming powering those tools, it had a series of gotchas in the connection of Forma on the cloud with Dynamo on the desktop and was ultimately too hard for beginners to pick up. We did the best we could at the time, but recognize the friction that existed and how difficult it was for some users to get working.
To allow for quick exploration, Dynamo Player came pre-build with several sample graphs, including the spectacular Pixel Tower. This sample is a simplified homage to the MahanNakhon tower, a mixed-use high-rise in Bangkok, Thailand, designed by Büro Ole Scheeren Group.
![]()
While the samples were a first step toward Dynamo-powered Forma workflows, the objects created through Dynamo Player were not Forma elements. Rather, they were meshes sent to Forma, meaning that users had to manually configure things like buildings, floors, and functions using 3D Sketch, a native tool on the Forma side.
In addition, the multi-step installation process to access Dynamo Player posed a series of challenges. Users had to install Dynamo, download a Dynamo package, add the extension in Forma, add a trusted path, and have a correct version of Dynamo running every time they wanted to use Dynamo Player in Forma.
Dynamo’s reason for being is increasing efficiency, so one of our key goals was to vastly streamline this complicated process and make accessing Dynamo Player as effortless as possible.
Where we are today: Welcome to a new era of Dynamo in Forma
Dynamo as a cloud service in Forma represents a monumental leap forward in design automation. Imagine creating native Forma elements in Dynamo, without the need for manual configurations to make things Forma-compatible—unless you really want to do so. This elegant connection means you can now set up powerful, repeatable routines and automations for your entire team, with Dynamo working its magic behind the scenes to deliver robust, native Forma objects and elements. The possibilities are endless, and the impact on your workflow will be nothing short of transformative. We’ll dive into an example of Dynamo cloud service in action in another section of this post.
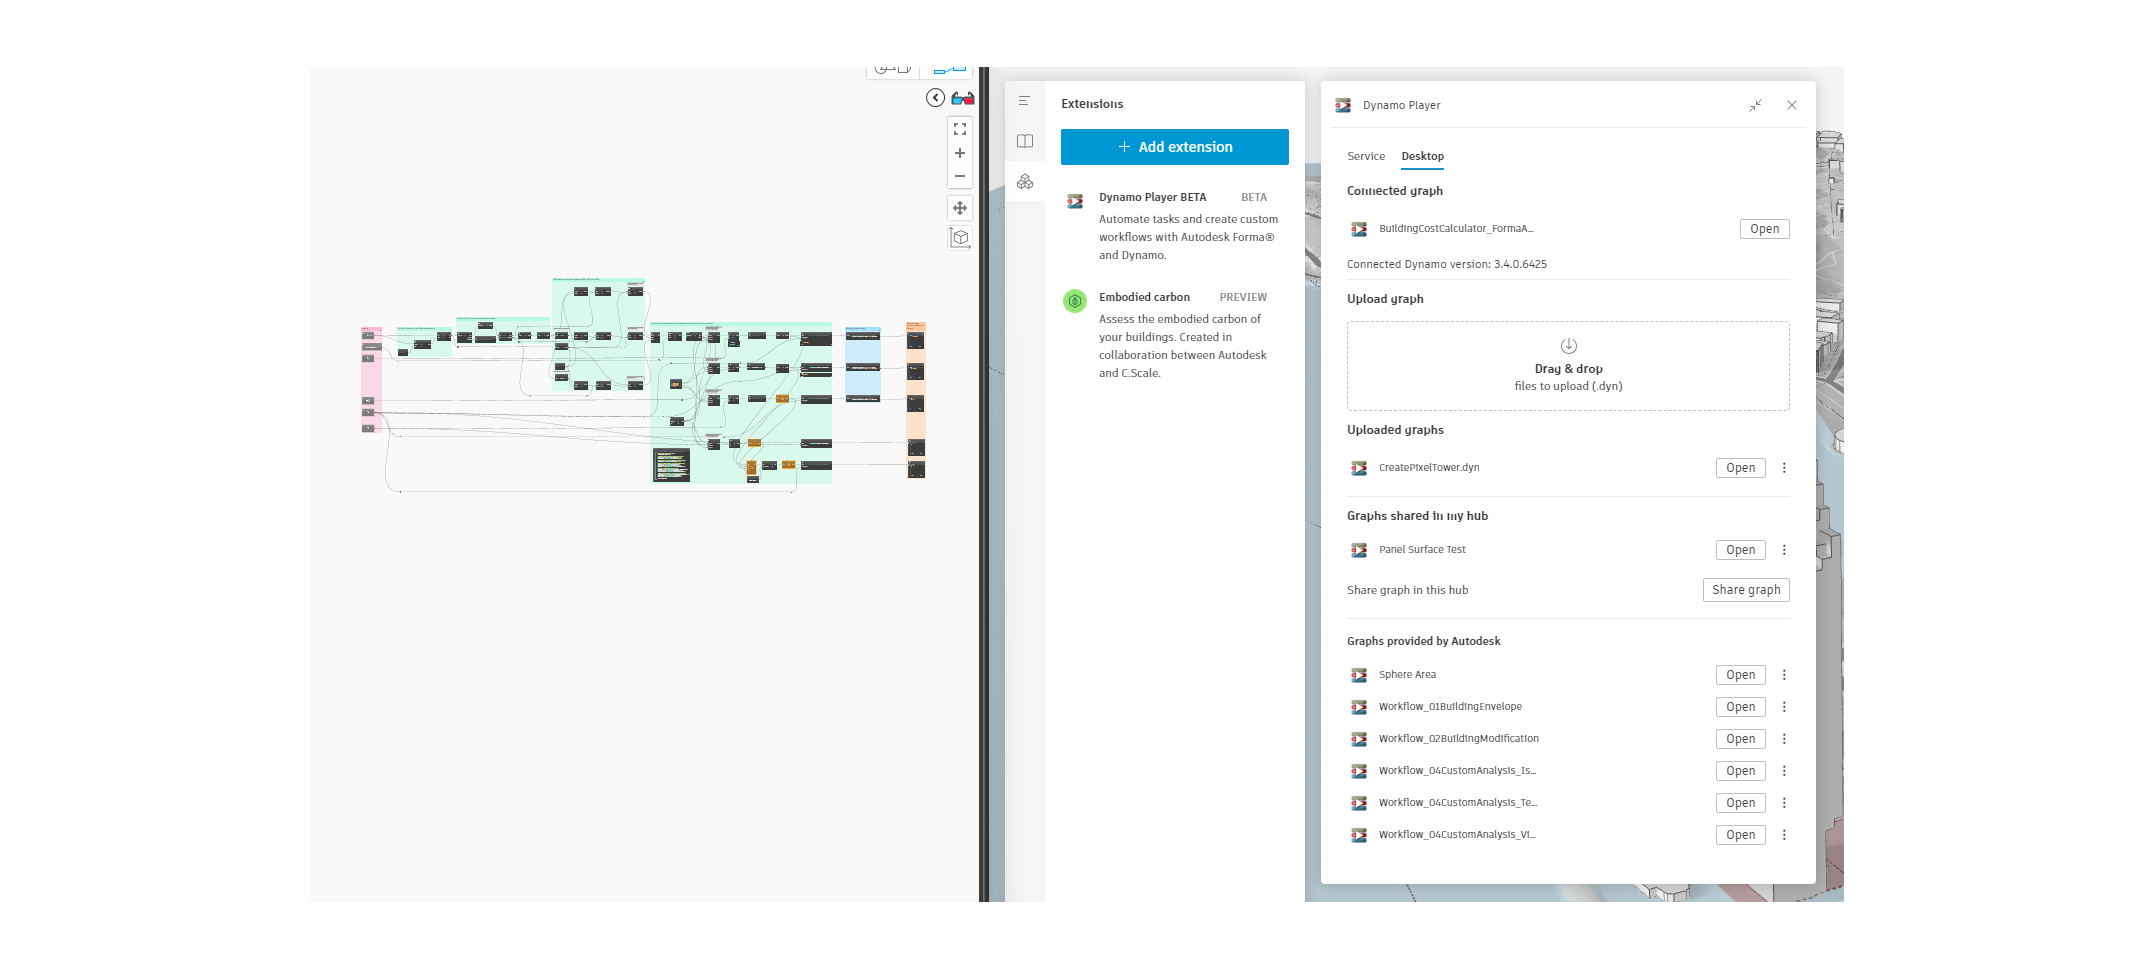
Dynamo as a cloud service opens up a new world of seamless integration. You’ll notice the difference at first launch: New users no longer need to go through a complicated installation process to access Dynamo Player. In fact, you no longer need to download anything to be able to use Dynamo Player in Forma. Simply open a project and go to the Extensions panel, click Add extension, search for Dynamo Player, then click Add. At this point, you’ll be able to access Dynamo Player under Extensions. And if you already have the extension installed, there’s no need to add it again.
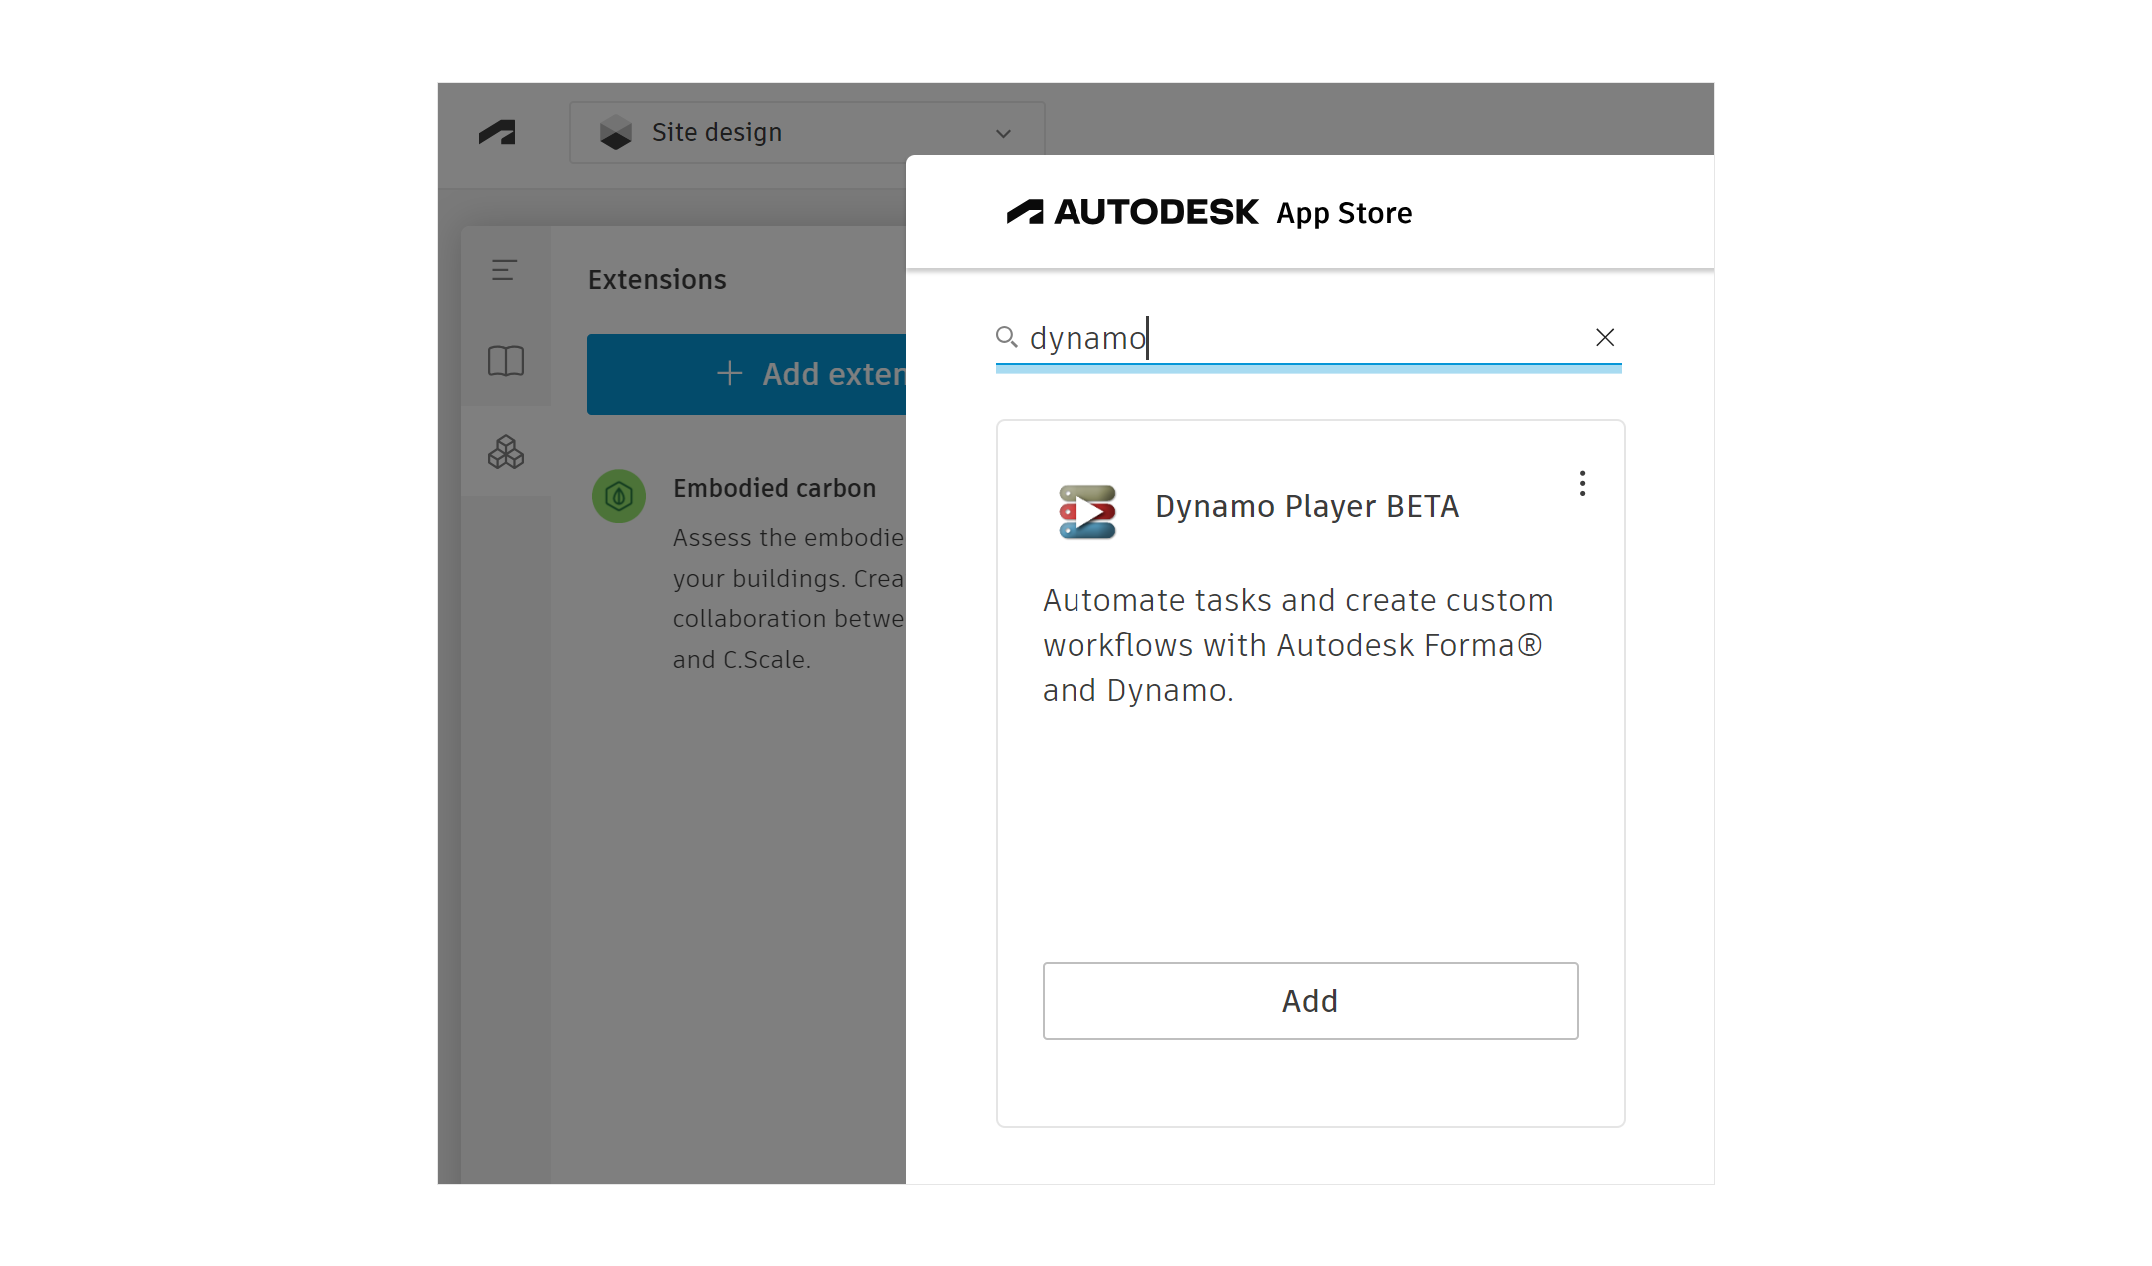
You also no longer need to have Dynamo running to be able to use Dynamo Player in Forma. This is because there is now a service that Dynamo Player connects to directly. Just open the extension and start exploring the Autodesk-provided samples, graphs shared by others in your company, or your own graphs.
The absence of a convoluted installation process means that Dynamo Player is now more accessible than ever to any Forma user, regardless of their Dynamo experience. The built-in samples are available for anyone to experiment with, and proficient Dynamo users can tweak samples to better suit their needs or add more graphs to be shared with their colleagues.
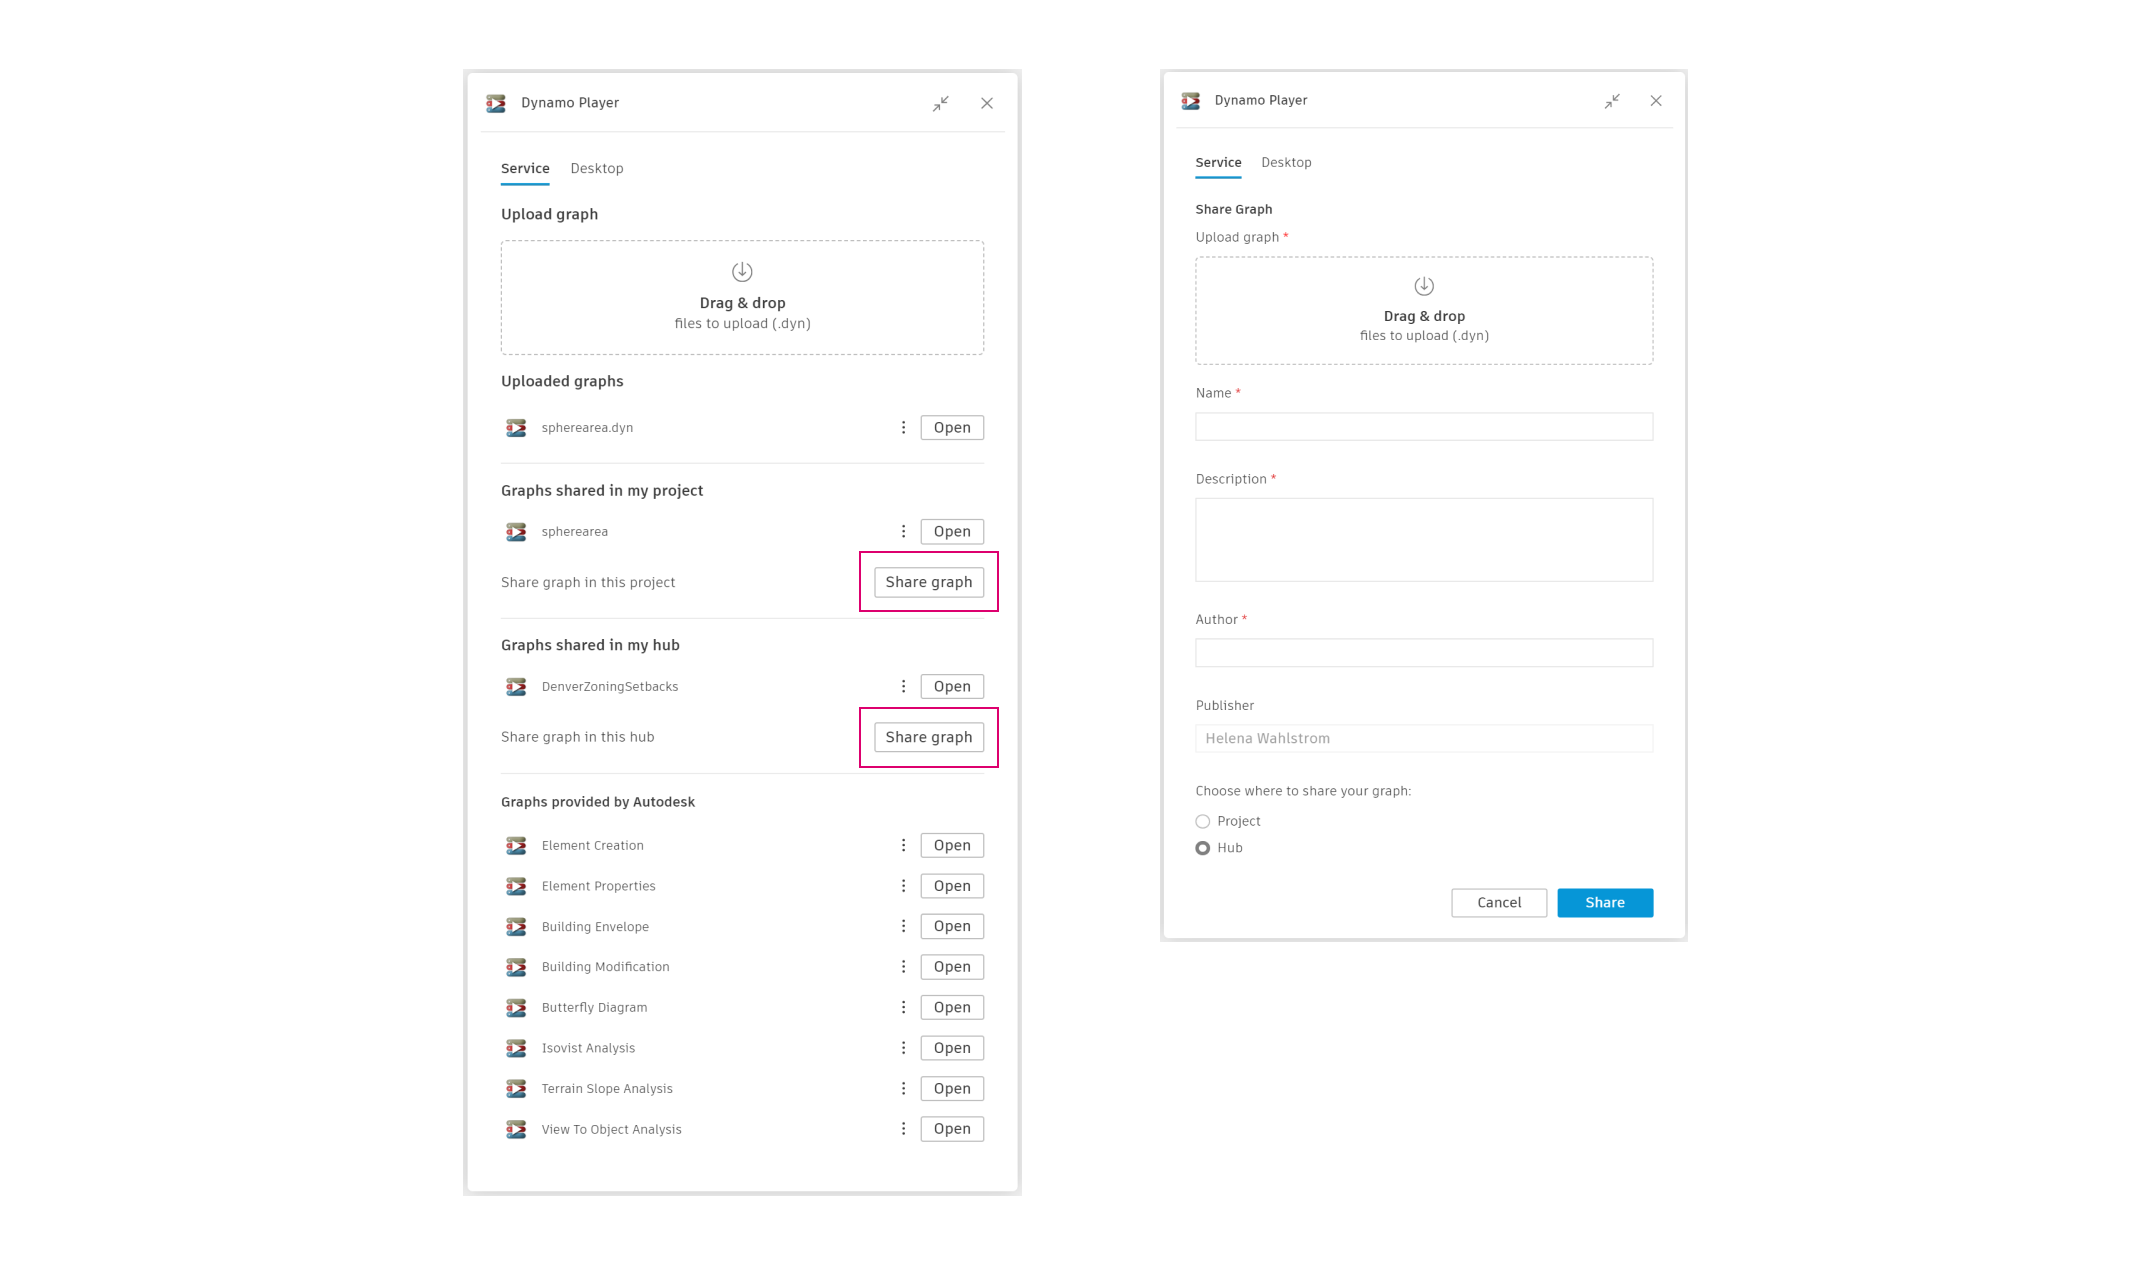
Graphs can be shared to a project or a hub. A hub includes multiple projects. To share a graph, click Share graph and enter graph details. You can choose whether to share the graph to the project or hub. Once you click Share, it becomes available to other users with access to that project or hub.
User interface updates
The new era of Dynamo in Forma comes with major user interface improvements as well. Let’s go over the major ones.
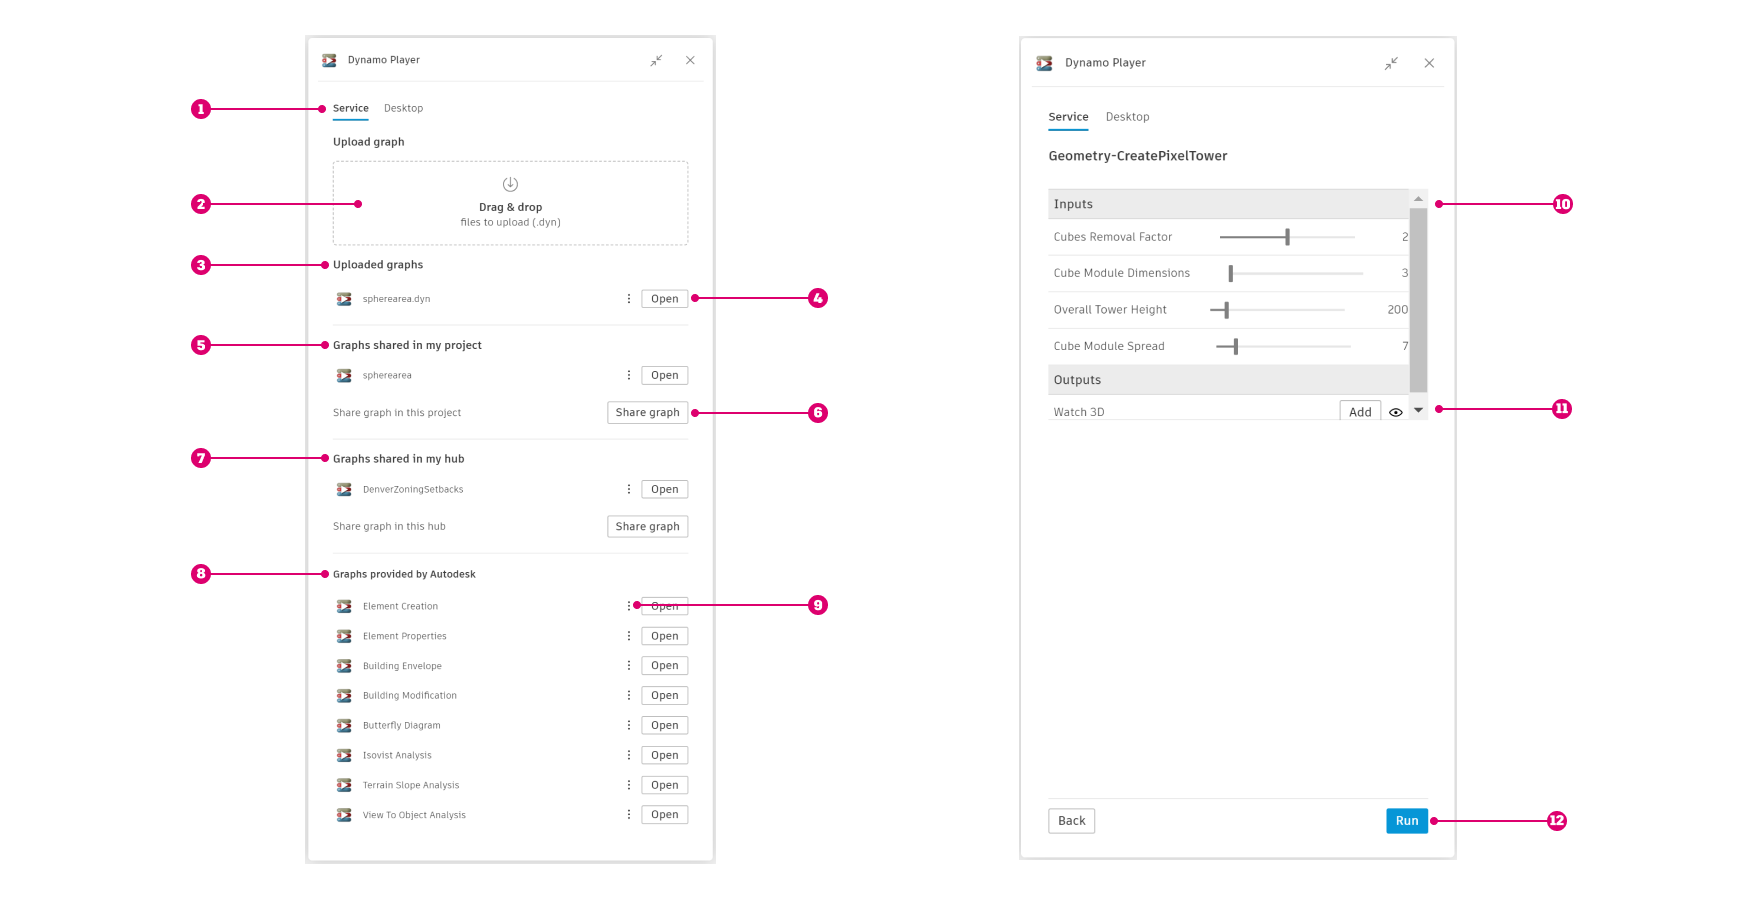
- [ 1 ] While you now have access to Dynamo as a service, you can also use the old desktop method, or switch between the two by using the tabs near the top of the panel.
- [ 2 ] To add graphs to Dynamo Player, click this area or drag and drop your .dyn file there.
- [ 3 ] As you add graphs, they appear in the
Uploaded graphssection. - [ 4 ] Click
Opento access UI controls for the graph. - [ 5 ] The
Graphs shared in my projectsection is where you can access graphs that you or others have shared to this project. - [ 6 ] Click the
Share graphbutton to share a graph to your project or hub. A hub includes multiple projects. - [ 7 ] The
Graphs shared in my hubsection is where you can access graphs that you or others have shared to the hub. - [ 8 ] The
Graphs provided by Autodesksection includes built-in samples that give you a quick start to exploring Dynamo in Forma. - [ 9 ] The context menu next to each graph gives you more options.
- [ 10 ] When you open a graph, you’ll see graph inputs in this section. Use the controls to make adjustments.
- [ 11 ] After you run the graph, outputs appear in this section. Click
Addto add it to the proposal. - [ 12 ] Once you’re happy with the inputs, click
Runto execute the graph.
Example: Pixel Tower
We’ll use the familiar tower as an example of the leveled-up Dynamo workflow in Forma. As we saw, the old way of creating this tower involved a lot of manual configuration via 3D Sketch. In the new Dynamo/Forma world, when you use the built-in sample in Dynamo Player, the tower is created as a native Forma element. An easy way to see the difference is to hover your cursor over and click the different parts of the tower: You’ll start seeing floors, area metrics, and more.

Pixel Tower times three as native Forma elements, and the Dynamo graph that generates the tower.
Creating native Forma elements right out the gate gives you fast access to the variety of analysis tools in Forma. These include:
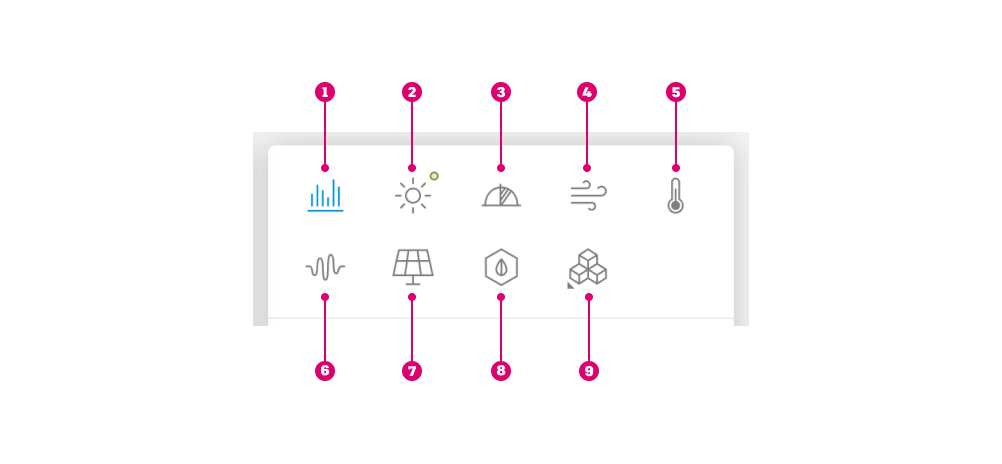
- [ 1 ] Area metrics
- [ 2] Sun hours
- [ 3 ] Daylight potential
- [ 4 ] Wind
- [ 5 ] Microclimate
- [ 6 ] Noise
- [ 7 ] Solar energy
- [ 8 ] Embodied carbon (beta)
- [ 9 ] Add extension, for adding more types of analyses to Forma via third-party extensions
Below, example analyses are shown for the trio of pixel towers.

Expanding your design capabilities
Curious about how to jump in? Let’s take a closer look at how you can use Dynamo Player to create Forma elements. There are three basic approaches, in order of increasing complexity and level of control:
- Send geometry to Forma: This is the old-school way, available from the beginning of last year’s Dynamo in Forma Beta, where you create Dynamo objects and send them to Forma as meshes. You’ll need to have Dynamo running and the DynamoFormaBeta package installed to use this method. For Dynamo version 2.x, install the DynamoFormaBeta for 2x package via Package Manager, and for Dynamo version 3.x, install the DynamoFormaBeta package. Once installed, you can create something in Dynamo, such as geometry, buildings, roads, or terrain, and send it to Forma, where you’ll need to manually make it Forma-compatible. Refer to this blog post for step-by-step instructions for adding a site limit, floors, etc. to the Pixel Tower. If you already have geometry created in Dynamo and don’t need to work with the Forma API to create native Forma elements, this may be the method for you.
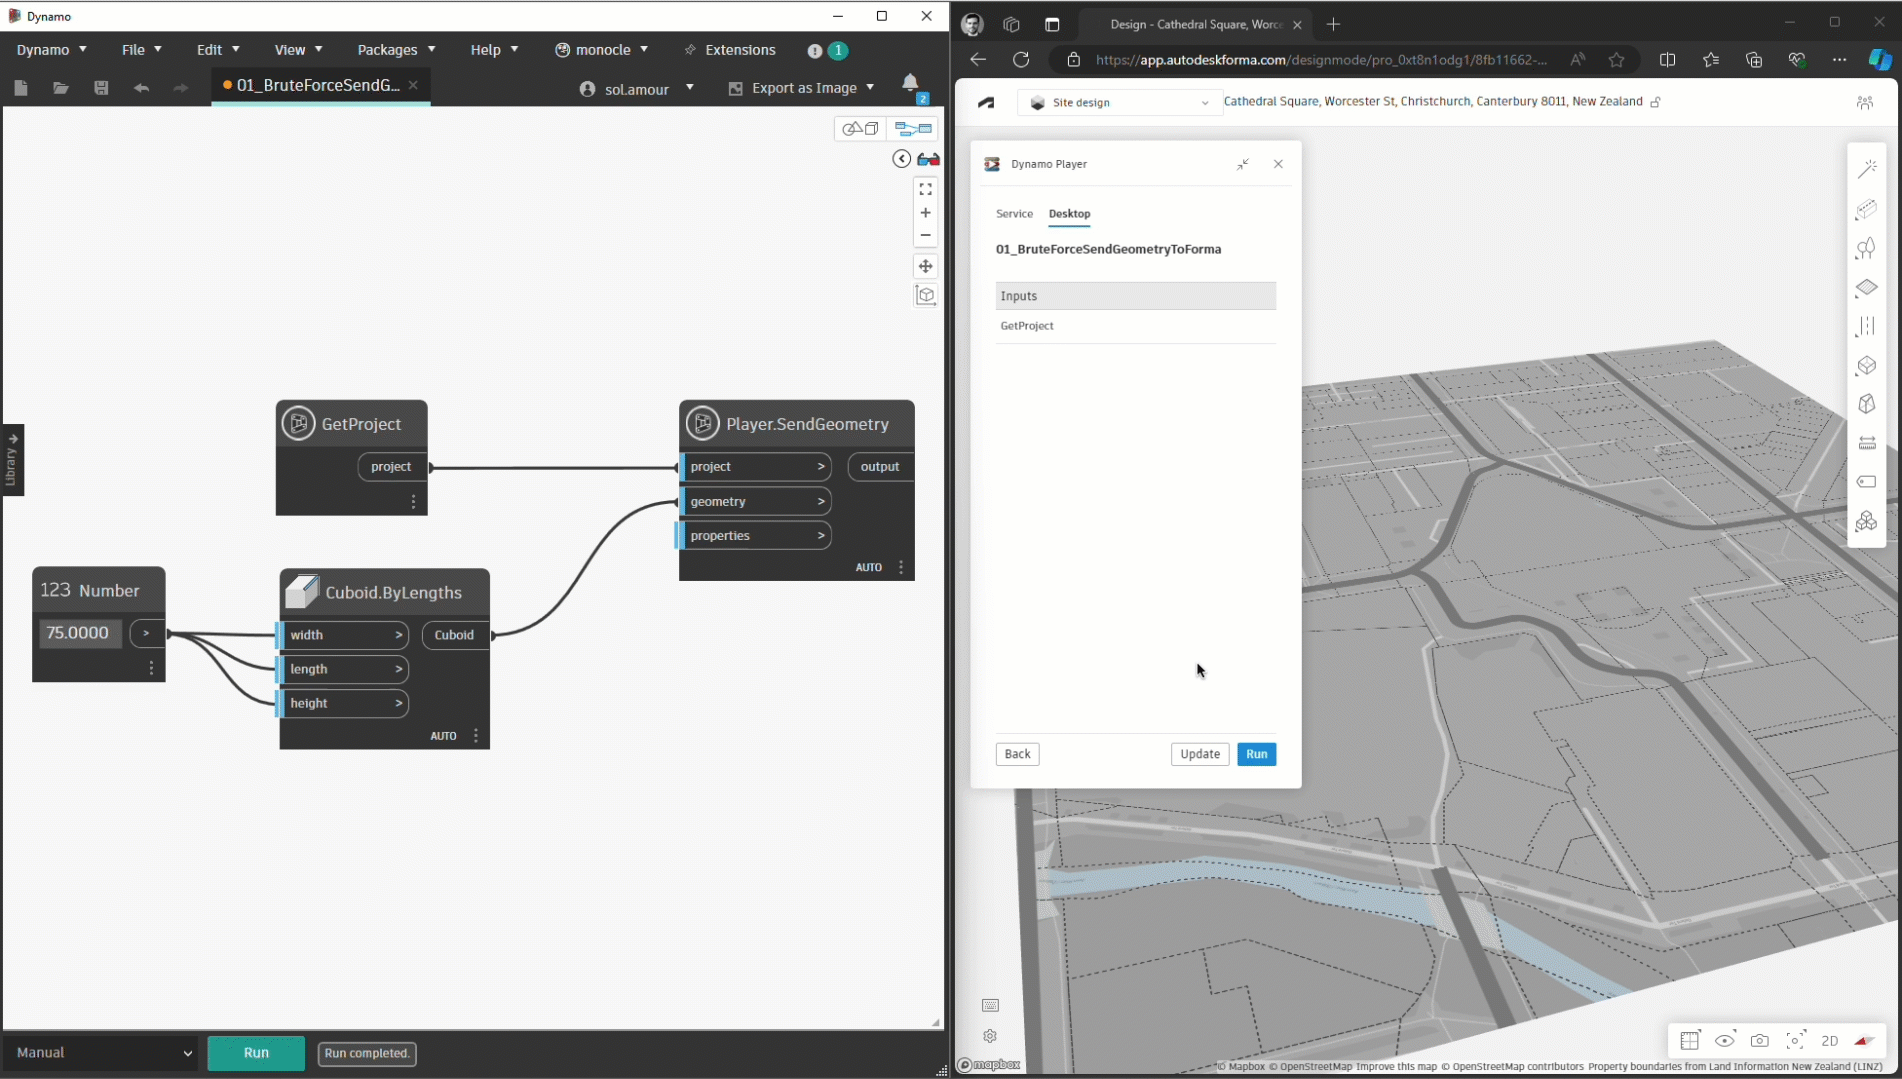
In this example, we create a cuboid in Dynamo and send it to Forma, where it’s added as a mesh.
2. Start with the nodes and custom nodes in the Forma package: To help you get started creating Forma elements in Dynamo, we’ve included several nodes and custom nodes in the DynamoFormaBeta node library. You can access this library by opening Dynamo version 2.18 or newer with the DynamoFormaBeta package installed while Dynamo Player is running in Forma. Custom nodes are located under Forma > Elements > Create. To view the inner workings of a custom node, double click anywhere but the header, or right click > Edit Custom Node. You can then make adjustments and investigate how the custom node works, which serves as a great starting point for learning more advanced ways to create Forma elements by leveraging the API. This method is great if you are looking to create native Forma elements and are ready for a more advanced, albeit guided, approach.
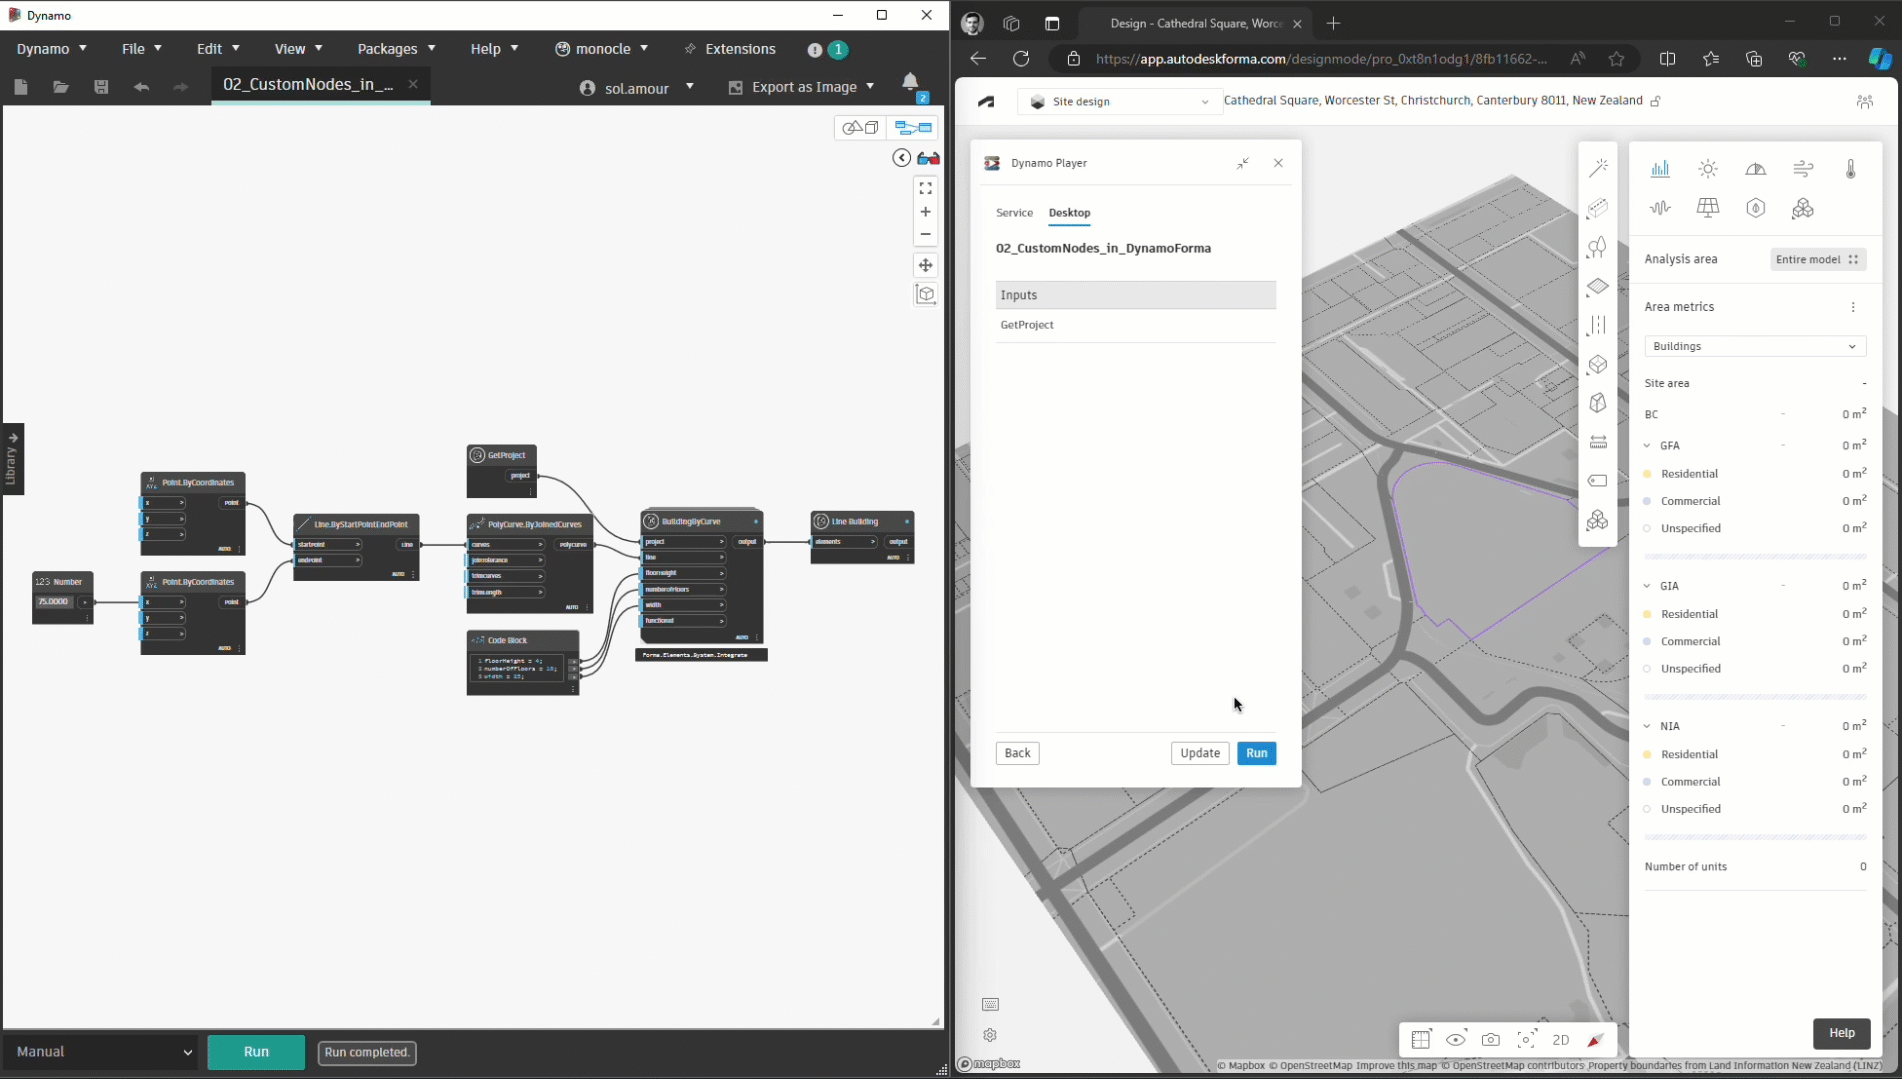
In this example, we use a custom node in Dynamo to create a line building, which comes in as a native Forma element with area metrics and other data.
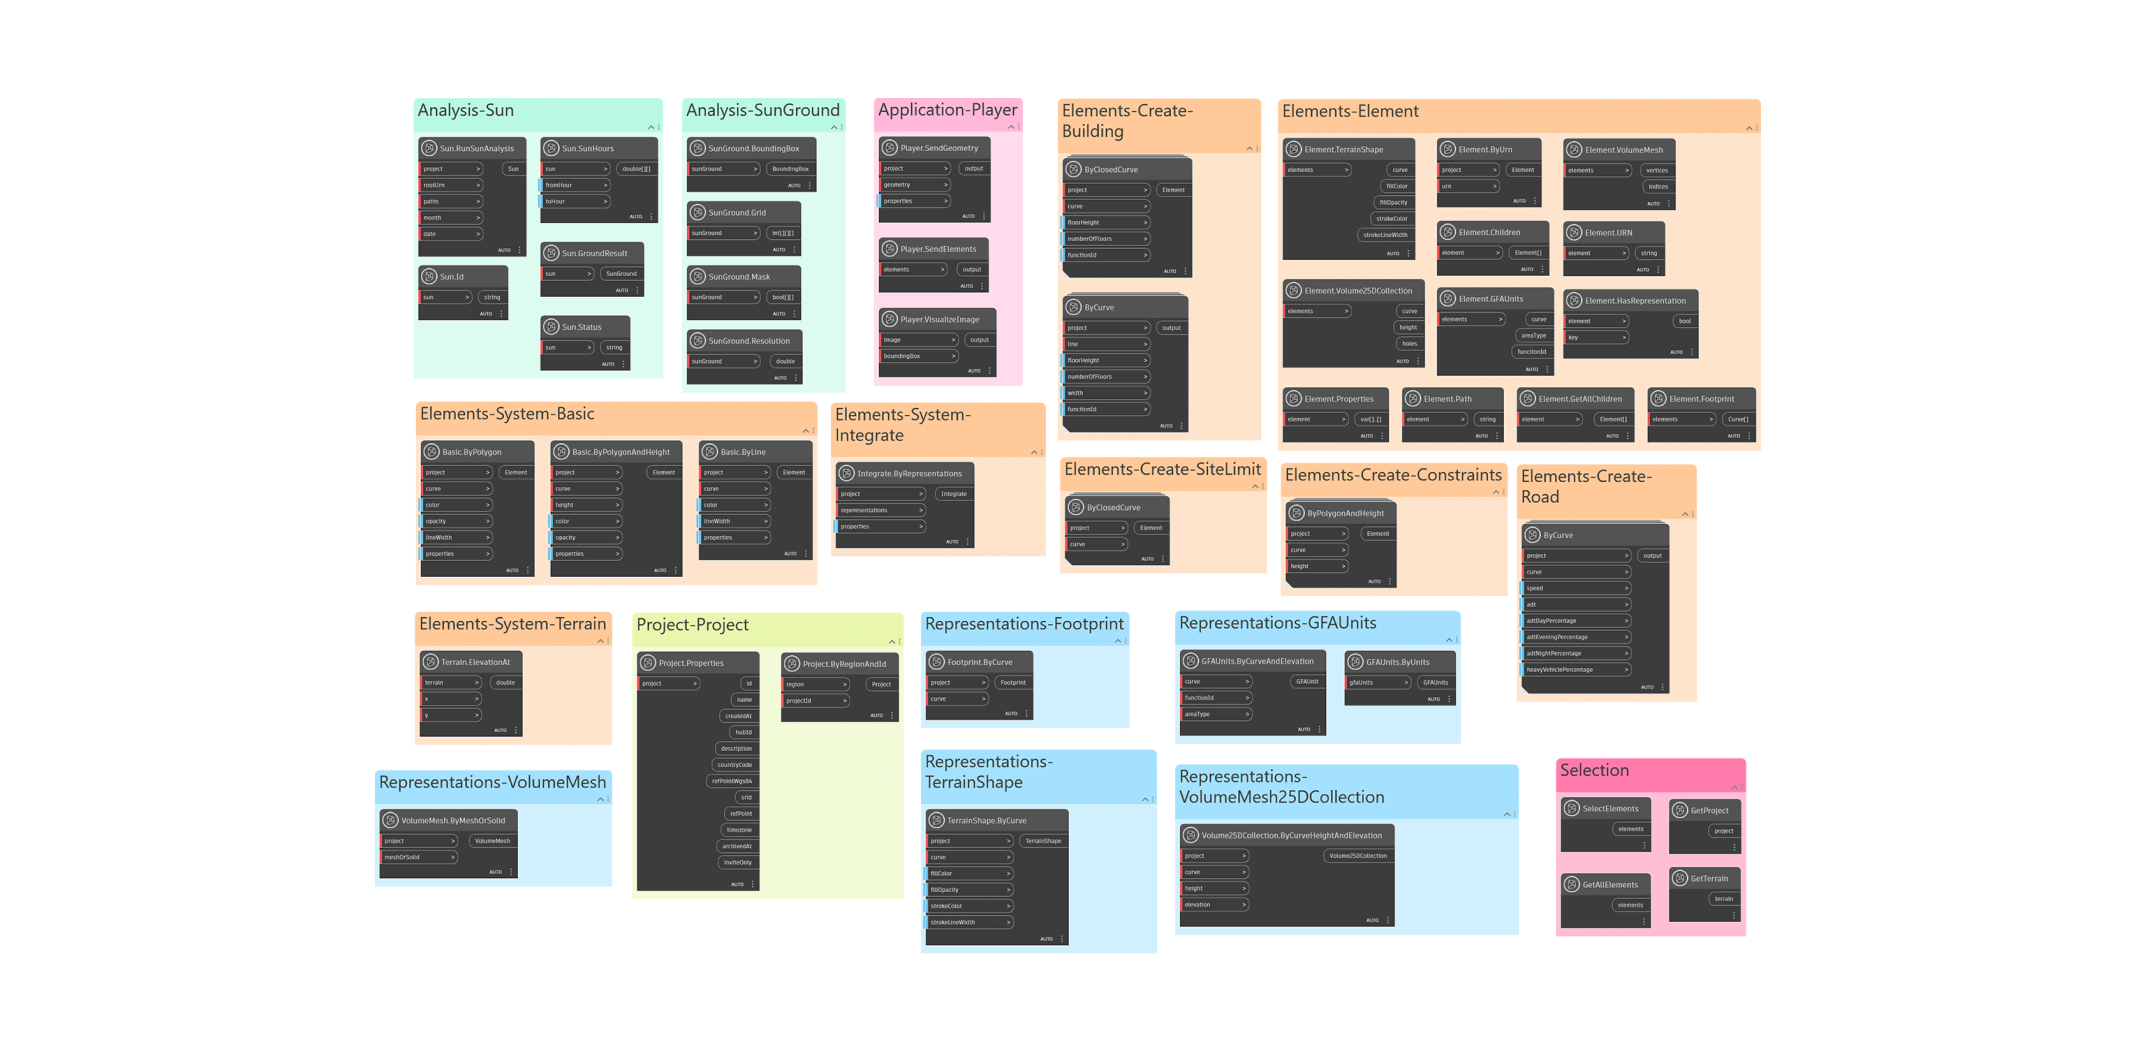
Nodes in the current but ever-evolving Forma package
3. Create your own graph: This method gives you the most control, but it also requires the most expertise. You can create representations (more on these below) and define everything from scratch. The nodes in the DynamoFormaBeta package mimic the Forma API and require you to carefully create the subcomponents of each Forma element (e.g., GFAUnits and volumeMesh) and assign the correct properties (Color, Function, etc.) for it to show up and behave correctly.
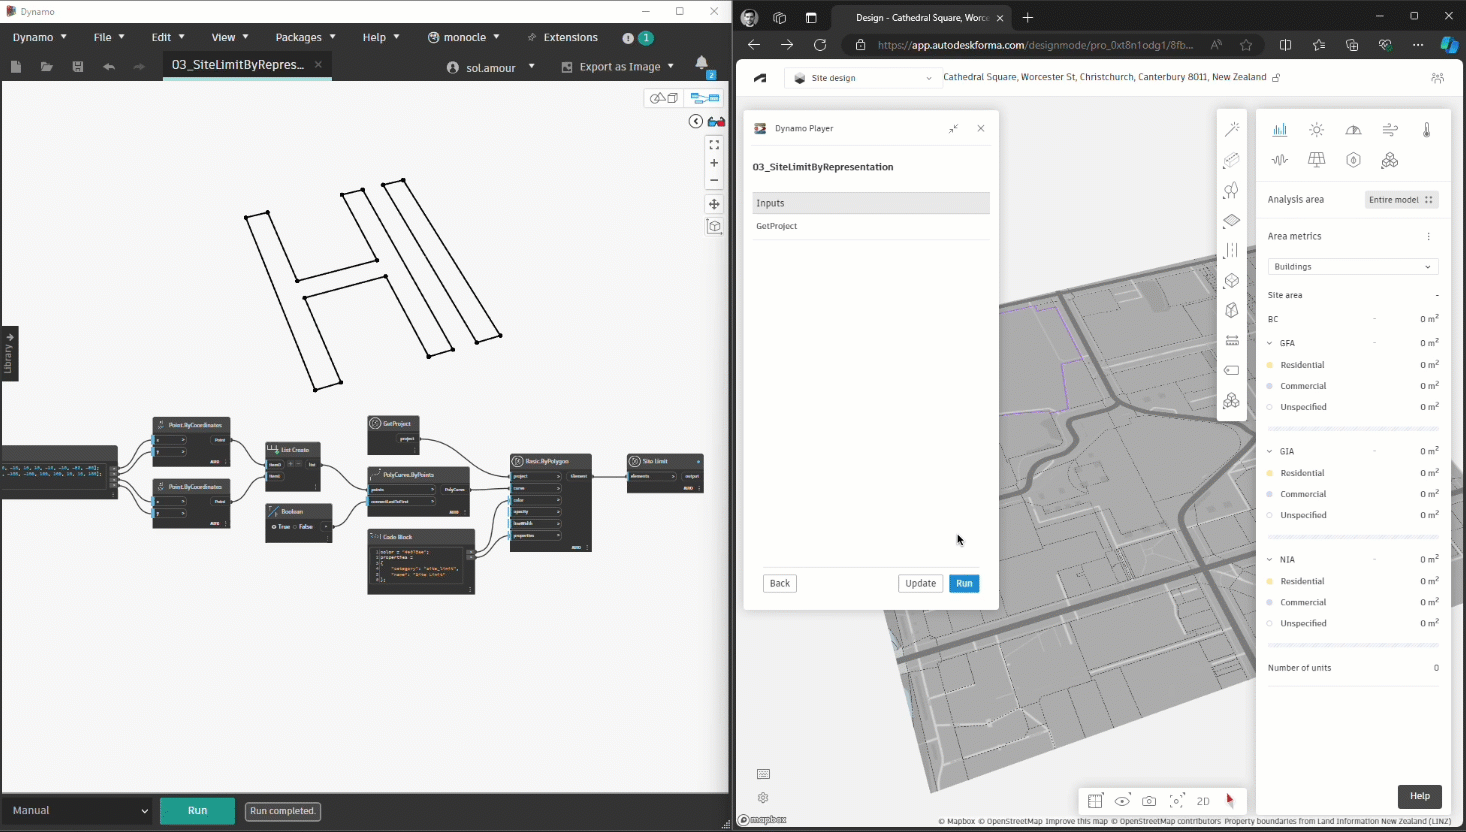
Creating native Forma elements in the form of a friendly greeting using a custom graph in Dynamo.
Below is an example graph that “snoops” on Forma elements, showing you what properties Forma elements have and how you can use these in building your own graphs.
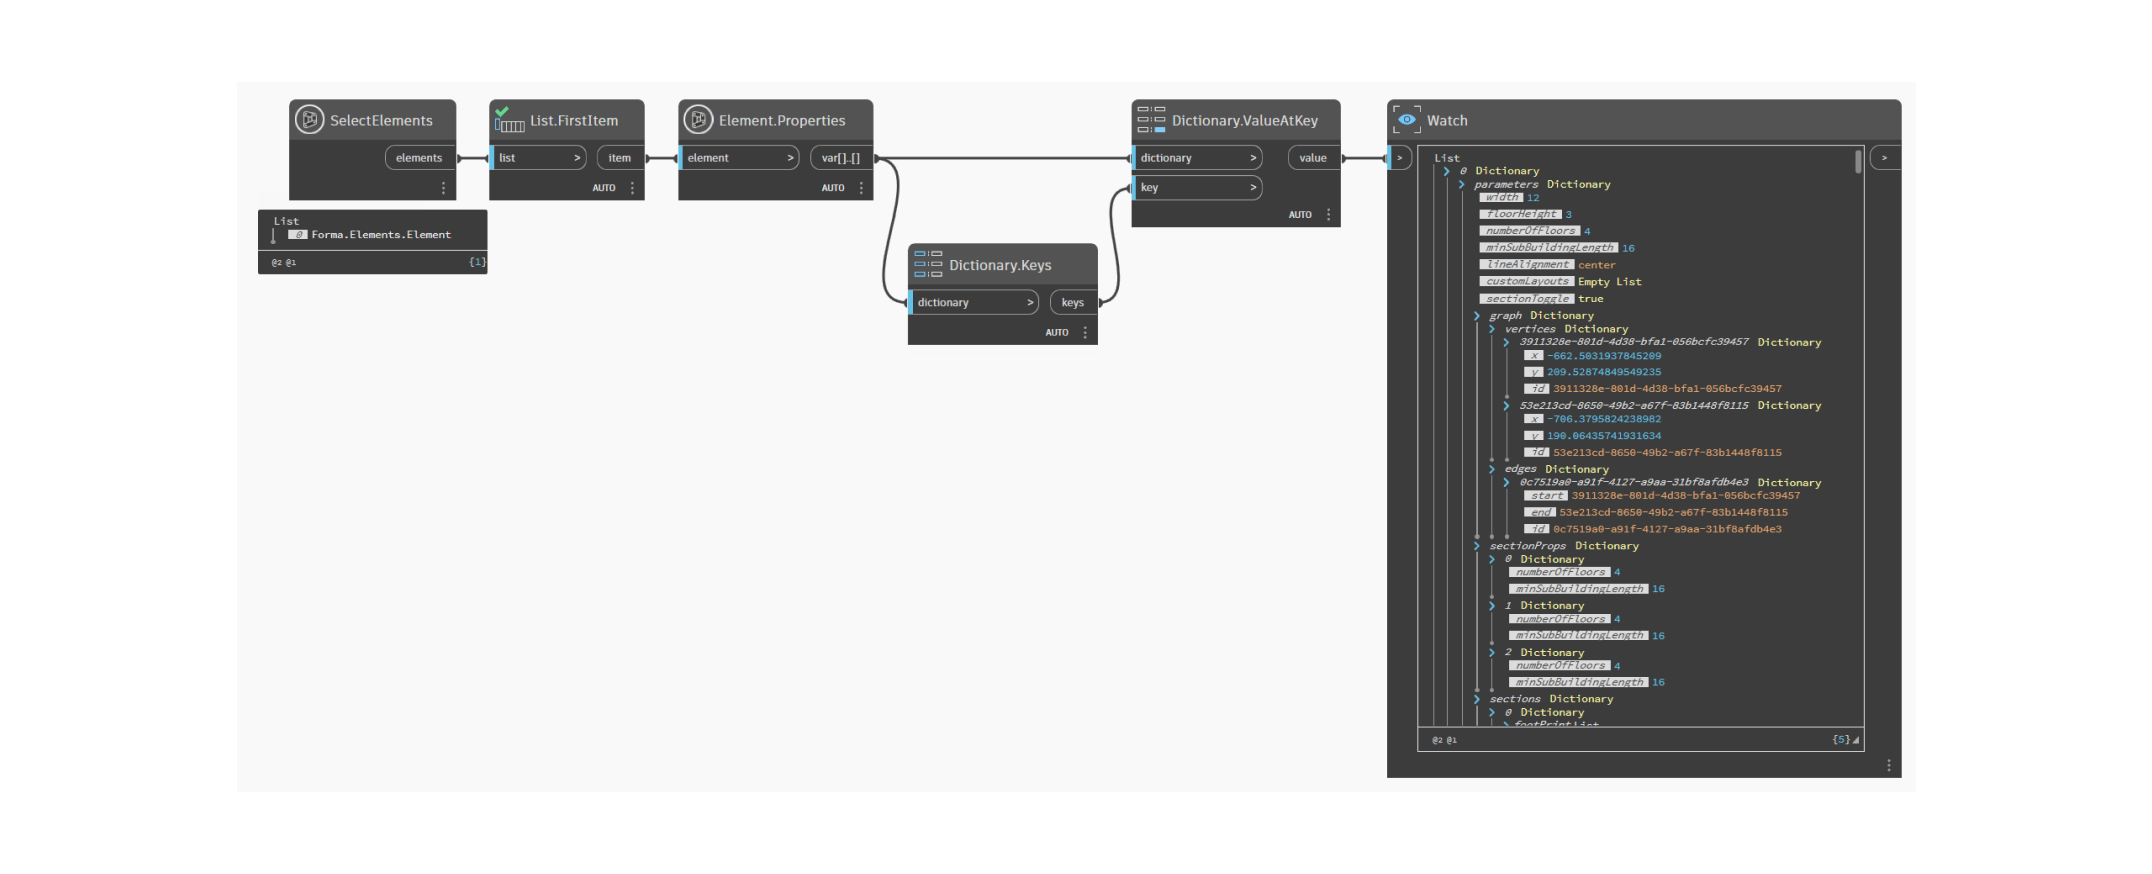
A key term to know when working with the Forma API is representations. Representations provide ways for an element to be interpreted. An element can have zero, one, or several representations which unlock different functionality. For instance, the volumeMesh representation describes how it should be rendered in a 3D scene, while grossFloorAreaPolygons describe the partition of gross floor areas which the element contains. To learn more about FormaElement specification for the Forma API, refer to this resource.
Dynamo desktop for debugging and development
As mentioned above, you can still access the desktop version of Dynamo in Forma by clicking the Desktop tab in Dynamo Player. If you don’t already have Dynamo and the DynamoFormaBeta package installed, the wizard will walk you through the process. While the desktop option doesn’t include the robust improvements discussed in this post, you can use it to build your own graphs and debug any issues.
Desktop has a few advantages:
- You can use Python and any package. In Dynamo as a service, you can’t use Python and you can only use sanctioned packages.
- You can work directly with the Forma API from the desktop, not just through Dynamo Player (= Connected Client).
While Dynamo is running, clicking Open will open the graph in Dynamo as well as Dynamo Player. You may need to save changes in Dynamo before it can be updated.
If you make changes to the graph in your local Dynamo environment while connected to the Dynamo Player extension, click the Update button on the bottom next to the Run button to sync the latest changes to the extension.

Conclusion
Dynamo as a cloud service enables unprecedented connectivity with Forma, from effortless access to native element creation to easy sharing. With the enhancements it brings, the power of Dynamo automations is at every Forma user’s fingertips. Dynamo in Forma has never been better, so if you’ve been waiting for a good time to try it out, now’s the time to sign up for the invite-only beta of Dynamo as a service in Forma! Again, you can sign up via this link:
https://feedback.autodesk.com/key/DynamoForma.
Forma is available for a free trial, and you can purchase it as a standalone or as part of the AEC Collection. Go to this website to learn more.