Dynamo is valuable tool for automating processes in Civil 3D and Revit—especially processes that are repeatable or require revision in the future. While it offers significant time-savings, designers can find it difficult to build Dynamo graphs and create these complex automations.
What if there was a way to automate Dynamo itself? Now with Autodesk Assistant in Dynamo, currently available as part of an Alpha, this is a reality.
In this blog post, I’m going to share my process of using Autodesk Assistant to fully build out complex Dynamo graphs to automate my modeling process for placing as-built weir stones into a Revit model for the construction of a fish passage. I’ll explain the process, including some pitfalls and how I overcame them, and share the prompts I used to direct Autodesk Assistant through graph creation. I’ll also share some tips for making the most out of Autodesk Assistant in Dynamo.
Project Background and Design Context
The project involves the addition of a fish passage to an existing navigable lock and dam. The lock and dam maintain different water pool elevations to create larger slack water pools for marine navigation and freight transport. However, these large structures become a barrier that eliminates the ability for native fish to navigate from pool to pool. We are tasked with constructing a fish passage to address this problem. This massive fish passage has many pools and ridges as elevation slightly increases, constructed of various aggregate layers. On top of each ridge are large weir stones to help dissipate energy from fast-moving water, creating calmer pockets that allow fish to rest as they navigate upstream.
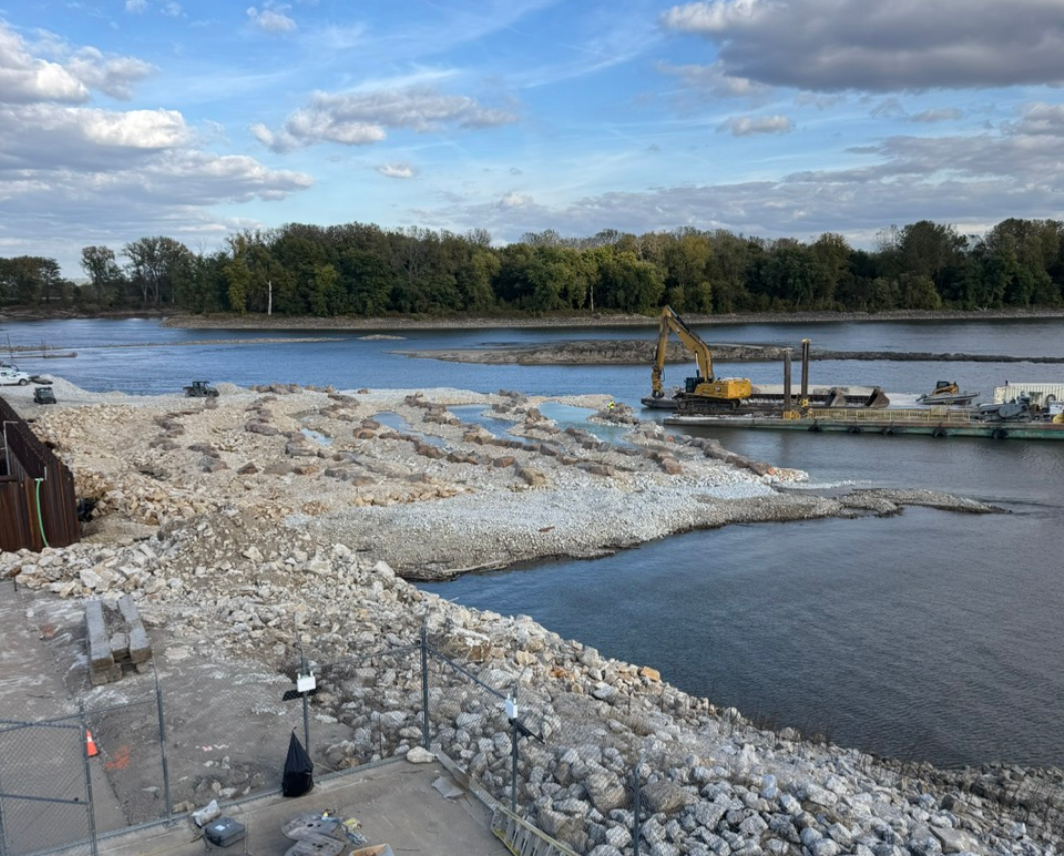
Partial fish passage completion
Before Autodesk Assistant: Early Dynamo Workflow
Initially, Autodesk Assistant was not yet available in Dynamo. My objective was to create a Revit model for the field crews to use, based on the IFC plans. The design files showed there would be approximately 881 weir stones placed along the fish passage. I created a Dynamo workflow to place a generic weir stone at a Coordinate Geometry (COGO) point derived from Civil 3D. Additional COGO points were utilized to maintain the proper alignments between weir stones on a given ridge within the Revit model. This worked great: With one click of a button, it placed all the weir stones exactly as the plans had stated.

Initial Revit Model
Adapting for As-Built Conditions
As construction began, the actual weir stones from the quarry varied greatly in size and were mostly larger than the design had called out. To accommodate this change, I needed to rebuild the Revit model based on as-built data from our survey team. As construction proceeded, the survey team provided coordinates for each stone’s center of mass and corresponding weight. This data formed the foundation of creating a digital twin of the fish passage.
Utilizing Autodesk Assistant Alpha in Dynamo for Civil 3D
Here’s where Autodesk Assistant became essential. I uploaded the COGO data into Civil 3D and manually created some alignments along each wave in the passage (point to point at each COGO point/weir stone along a wave).
From there I used Autodesk Assistant in Dynamo to collect the data within Civil 3D and export as a JSON. This workflow using Autodesk Assistant was quite straightforward using simple prompts such as:
- “Extract the COGO data from points group ‘weir stone actual placement’ and create a list to use for placement in Revit”.
- “Extract the ‘descriptions’ field from the COGO points data, create a list for tonnage size using that description as the size. Use that list to define which model element corresponds with the size of each stone.”
- “Extract the alignments in site ‘weir stone alignments’ and prepare them as polycurves and set them up the export as json files”.
These prompts generally worked well in Dynamo for Civil 3D using Autodesk Assistant Alpha and created a Dynamo graph ready to export three different JSON files for the COGO points, tonnage sizes, and alignment PolyCurves.
However, there were a few hiccups. One of them was getting all the data into one JSON file using only Autodesk Assistant Alpha. To combat that, I would split differentiating data into separate JSON files, knowing I’d reference them individually in Dynamo for Revit. Also, I had to rewrite prompts because they weren’t clear enough initially or left the prompt too open-ended. Keying in on correct prompt submissions made this workflow take mere hours to have data ready to import into Revit.

Parts of the finalized Dynamo for Civil 3D graph using only Autodesk Assistant Alpha
Implementing the Process in Revit
I have my federated model of the fish passage in Revit with topography and toposolids prepared from Civil 3D and Inventor. These elements gave 3D representation to the layering of rock required to build up the civil surfaces of the pools and ridges. Additionally, I have structural elements we are constructing in addition to civil site work such as the cofferdam, future piers, and bridge, which are geolocated in Revit.
In Dynamo for Revit, I started off by prompting Autodesk Assistant the entire workflow. My initial prompt instructed the Autodesk Assistant to:
“Import the three json files for COGO points, alignments, and one for tonnage sizes. Place a weir stone model element at each COGO point, but the model element is dependent upon the tonnage size. Round the tonnage size to the nearest whole number between 2 and 8 tons. Set it up for me to assign the model elements in Revit. Once we have the elements placed, we will extract the polycurve alignments and rotate the weir stones tangentially to the nearest point on the polycurve alignment.”
What Didn’t Work
As is expected in the Alpha stage, Autodesk Assistant in Dynamo is working through some growing pains as the team continues to improve it, and I did encounter some challenges while experimenting with it. While the overall prompt strategy was theoretically sound, it ended up being too much for Autodesk Assistant to process in a single interaction. It kept trying to build every subroutine simultaneously, which often led to circular dependencies or partially completed processes.
Other times I’d be making good progress redirecting the workflow only for my tokens to expire, forcing me to end the conversation and restart. Because Autodesk Assistant currently doesn’t retain memory between sessions, each restart meant losing all prior context, which quickly became frustrating. At that point, it was clear I needed to change my approach.
What Worked
I pivoted to a slower, more incremental workflow, basically treating the whole build-out like a checklist. I began by breaking the task into very small steps: Extract data from the JSONs, verify that data, define what format it needs to be in, and then guide the Assistant using specific nodes or suggestions instead of handing it everything at once. In a few cases, I even split workflows into totally separate graphs just to keep things simple and manageable.
Once I started working this way, Autodesk Assistant Alpha behaved much more predictably, and the graph build-out was far easier to control and understand.
Key Strategies That Helped
- Use checklists. Because the Assistant is stateless, any crash or token timeout wipes the conversation. A checklist inside the graph gave it a clear reference point every time I restarted the chat. The checklist was one of the few manual operations I used, repeatedly copying and pasting into the prompt window for Autodesk Assistant Alpha to review.
- Break prompts into smaller sections. The current context limitations mean Autodesk Assistant performs better when handling one focused task instead of a large, multi-layered request.
- Give clear do’s and don’ts. For example, instruct it to use native Dynamo nodes rather than generating unnecessary Python, and limit Python edits only to specific parts of the script to prevent runaway graph-building.
| Do | Don’t |
| Break the workflow into small, focused tasks | Give the Assistant a giant, multi-step prompt all at once |
| Save and reuse checklists to re-anchor after crashes | Expect the Assistant to remember previous sessions |
| Specify when to use native nodes | Let it auto-generate Python when not needed |
| Clearly limit the scope of script edits | Allow it to expand or rebuild entire graphs unintentionally |

Manually generated checklist prompt used every time I started a new Autodesk Assistant window

Final weir stone placement graph, mostly generated by Autodesk Assistant
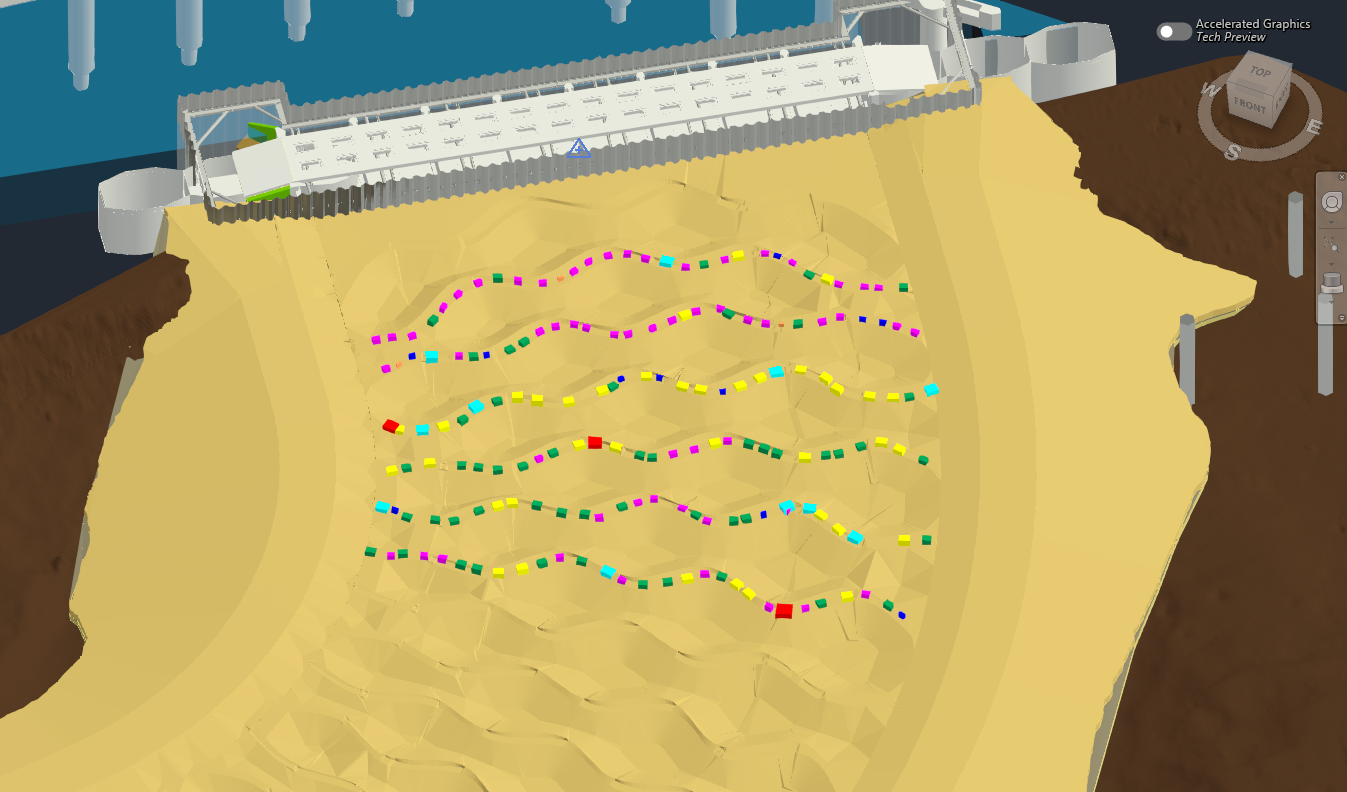
As-built weir stone placement model. Color-coded weir stones placed and rotated
Achieving Time Savings and Workflow Efficiency with Autodesk Assistant
Using Autodesk Assistant to build this Dynamo graph and place these as-built weir stones saved days’ worth of work compared to manually locating and orientating in Revit. As more stones are physically placed, I’ll continue to receive more data. By simply updating my COGO point file and running the graph, I’ll get an updated real-time model in Build for the crew to reference. The real-world need for these stones modeled and geolocated will be met in the form of as-built drawings showing exact locations and spacings between as well as having models for the customer to potentially use for water flow data analysis.
Without Autodesk Assistant, developing a graph like this would have taken weeks. I would have been back to square one, manually placing model elements within Revit. By utilizing ideas generated by Autodesk Assistant and restructuring my prompts, I had geolocated weir stones in Revit within a day.
Being able to leverage Autodesk Assistant in Dynamo represents a huge step forward in the evolution of design automation. By unlocking natural language processing alongside data-driven scripting tools, Autodesk has shortened the journey from conceptual direction to executable workflow. As this case study demonstrates, teaming up with AI allows us to perform complex, site-specific modeling faster, more accurately, and with far fewer manual adjustments.
Note from the Dynamo team: Would you like to try out Autodesk Assistant in Dynamo? Sign up for the Alpha today! More details in this Dynamo forum post.