Recently, I was explaining how the Graphical Column schedule for Revit was never intended to be placed on a sheet. From what I have read, the Graphical Column Schedule was only intended to be used for coordination. However, using some Shared Parameters for the Structural Columns, one can start developing.
Typically on industrial-type projects I would dimension the bottom of the base plate on a column schedule that was done in AutoCAD. As you might be aware, Revit will not allow you to dimension on schedules. I was asked if there might be a way to use Shared Parameters to perhaps tag the bottom of base plate elevation on the schedule then.
When you place a structural column, there is a Base Offset level parameter.
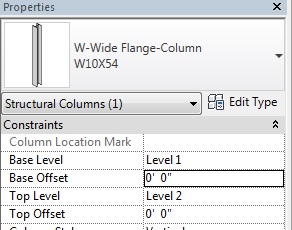 |
This Base Offset is a built-in Revit Parameter and cannot be accessed in any way with a regular Shared Parameter. However, with Dynamo, we should be able to access this parameter and write it to a new Shared Parameter. We can add in a new length-type Shared Parameter called Bottom Of Base Plate. You need to then add this Shared Parameter to the Project. Make sure to associate this Shared Parameter with Structural Columns. Now that we have all of this background work done, we can make our Dynamo script.
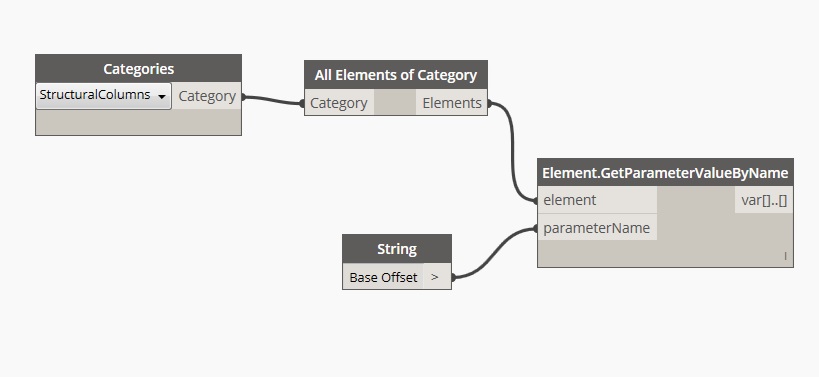
To begin we need the Categories node set to select all Structural Columns. Next, we need to tell Dynamo to select All Elements of Category. This node tells Dynamo to reach into the Revit project and select all elements from the category that we have selected. Up to this point our script should look something like this:
 |
Next we need to get the Base Offset parameter from the Structural Columns. This can be done with the Element.GetParameterValueByName node and connecting a String node with Base Offet. So, now we should have this script on our canvas:
 |
Now that we have retrieved the Base Offset parameter from Revit we need to assign that back to the Structural Columns and our new Shared Parameter. Using the Rhythm package maintained by John Pierson there is a custom node called SetParameterByName(TypeOrInstance). Using this node will finish off our definition and give us the following:

You might notice that I have placed a group around the custom Rhythm node. It serves as a reminder of which package it came from and, if I shared the actual DYN file with someone they will hopefully notice this group and look to see if they have the Rhythm package installed. Before I actually run this definition, let us look at a structural column that we have given a Base Offset to.
 |
You will notice at this point the -2′-0″ Base Offset has not been copied to the Bottom Of Base Plate parameter under the Dimensions category. When we run our script, this value will get copied into this new Shared Parameter and then will allow us to then use a custom tag. We can then tag the bottom of the base plate in a Graphical Column Schedule. So after creating a Graphical Column schedule and using our new Base Plate tag, we end up with the follow smart tag on our schedule:
 |
You can customize the look of the tag to include some parametric lines to match up with the lines in the schedule. If any of the structural columns have their Base Offset dimension change you will need to re-run the Dynamo script. You will not need to retag the column as it will update automatically.
After testing this new script, I started thinking how else could I use some of the built in Parameters that Revit will not allow you to access in any other way. I started thinking about beams that are modeled and referenced to a specific level, say maybe the Roof that has a height of 30′-0″. If I have a steel beam that has been offset from this level, could I use the z Offset Level to get this information and then use this same information in a tag to show the actual elevation?
In fact it turns out that I can once again thanks to the Rhythm package with some custom nodes I can accomplish this task easily. To get this done, let us start a new Dynamo script and begin with the Levels node and the All Framing at Reference Level from the Rhythm package. This does gathers all structural framing based off of a Level that we specify. So staring off we have the following:
 |
Next, we need to get the height of the Level and the z Offset Value. We will use the Element.GetParameterValueByName node for this, since that is what we are trying to get – the value of the Level (Elevation) and any z Offset Value for any beam at the level we are referencing. We will use some Code Blocks to get the parameter names that we are looking for. Now we should have something like this:
 |
At this point Dynamo should be getting the Elevation of the Roof Level and the z Offset Value of all framing elements on the Roof level. Now we need to add these values together. This can be done with the Addition node. Then we are ready to set a new Shared Parameter for this combined value to all framing elements at this level. For our new Shared Parameter I have named it: Top of Steel Elevation. So, with all of the nodes on the canvas and connected together we should have something like this:

Notice I have connected the All Framing at Reference Level node to the element input of the SetParameterByName(TypeOrInstance). This will end up applying the addition of the Elevation and z Offset Value.
We will also need to create or add my new Shared Parameter to my beam tag.
After I run the Dynamo definition and applying my new tag, I should get the following in Revit:
 |
Looking at the properties of the highlighted beam, you can see that it has been offset from the Roof level by 1′-0″ (the z Offset value). Since the height of the Roof level is 30′-0″, the tag correctly shows that the height of the beam is 29′-0″. If any beam elevations change you will need to re-run this script and potentially re-tag elements.
By utilizing Dynamo you can now use some of the built in parameters of Revit to accurately tag beams that might have been offset from their host level.
Special thanks to John Pierson (@60secondrevit) from sixtysecondrevit.blogspt.com for helping me understand his nodes in the Rhythm package for generally helping me along in learning more about Dynamo. The Dynamo community is by far one of the best for support in learning and debugging what you create.
 |
Tom Kunsman is a structural designer with over 20 years experience. Tom has worked on high profile Revit projects during the last three years ranging from renovations to a major National Football League Stadium and renovations to a major Cleveland Ohio museum. Tom is currently finding ways to utilize Dynamo in post tension concrete construction and steel truss creation. Twitter: @tkunsman |