
In Dynamo 1.2, we have introduced “List@Level”, a feature that allows you to directly select which level of list you want to work with right at the input port of the node. This feature allows you to access the levels of your list quickly and easily.
UI Basics: Anatomy of List@Level
“I just want to access this level of the list” is a phrase we heard often from you. So, that is what we now allow you to do. Just tell the node what level of the list you want to use as the input and let the node do the rest.
You may have noticed some changes to the preview bubble and watch nodes. These changes directly relate to the List@Level functionality found on the input ports of each node. At the bottom left of each preview bubble or watch node, you will see some List@Level notation. Just follow the lines up from this notation to determine which level to use.
List@Level should not to be confused with Rank. Rank, an integer, is the depth of a list. List@Level, an alphanumeric value, describes a location within a list. List@Level grabs the items found at a particular list location and promotes them to a list. In the list below, “@L1” would be a flat list of all the individual Points. Additionally, List@Level notation starts from the innermost list and works outward. While this may seem strange, this was done to ensure that you would not have to make adjustments to List@Level even if the hierarchy of your list changes. For instance, if you add an additional level to the list below, the individual items would still always be “@L1”.

You may also have noticed the new “>” button. Don’t be scared! Just click on it. It will reveal the List@Level menu.
 Inside this menu, you will see two options:
- Use Levels – This enables the List@Level functionality. After clicking on this option, you will be shown a spinner that will allow you to click through which level of the input list you want the node to use. Not sure what level you need to use to get the results you want? One of the best things about the spinner is that you can quickly try out different level options by clicking up or down.

- Keep list structure – If the List@Level functionality is enabled, you will have the option to keep that input’s level structure. Sometimes, you may have purposefully organized your data into sublists. By checking this option, you can keep your list organization intact and not lose any information! More about this later.

Before and After
“Just do some function passing using List.Map” If the above statement or the image below with four List.Map nodes is a bit confusing to you, you are not alone.

List@Level not only makes accessing various levels of your list easier, but it can also help you significantly reduce the amount of (confusing) nodes seen in the first graph and turn it into a graph that looks like this: 
We here at Dynamo have gotten a ton of feedback about the overall experience of Dynamo from node creation to exporting excel files. Time and time again we hear that list manipulation is one of the biggest pain points for our customers. We wanted to design and implement new tools that would not only be useful for advanced users, but also make it easier for new/beginning users to manipulate lists without having to understand concepts like “function passing” or “replication”.
With that being said, while working with you on your list management problems, we noticed that the lists you were working with often became very complex. It is not uncommon to find to yourself working with a list containing a list containing a list. 
To access the innermost lists in Dynamo, you would normally have to use List.Map (twice in this case) which can be quite confusing and add unnecessary clutter to your graph. Imagine having a list with 10 levels of lists (yes, this is possible); that would be a lot of time spent placing and connecting List.Map nodes!
Let’s take a look at an example: 
Let’s say I want to get the x-values along the south edge of each floor so I can determine where I can place a straight vertical facade that will completely intersect each floor. So, I know I need to get the 2 southernmost x-values for each one of the 8 floors so that I can use them to determine the largest x-value and start my facade there.
 Look at the default behavior of the graph above. As you can see, I don’t get the values that I want. The Point.X node returns all the x-values that fall along the edge of Floor 1. Before 1.2, I knew I needed to use List.Map in order to access the innermost lists to get the values I really wanted. I would have needed to use two List.Map nodes as seen in the image below to traverse past the outer lists which adds clutter and may be a bit tricky, especially for beginners.

Now, let’s take a look at using List@Level which returns the same results as the List.Map example. Using it eliminates the need for the List.Map nodes and keeps your graph less cluttered, easier to read, and easier to use.

Breaking It Down
List@Level can be applied to any input port of a node. A node can have none or any number of its ports using List@Level. So, what does it actually mean to “Use Levels”? Let’s take an even closer look.

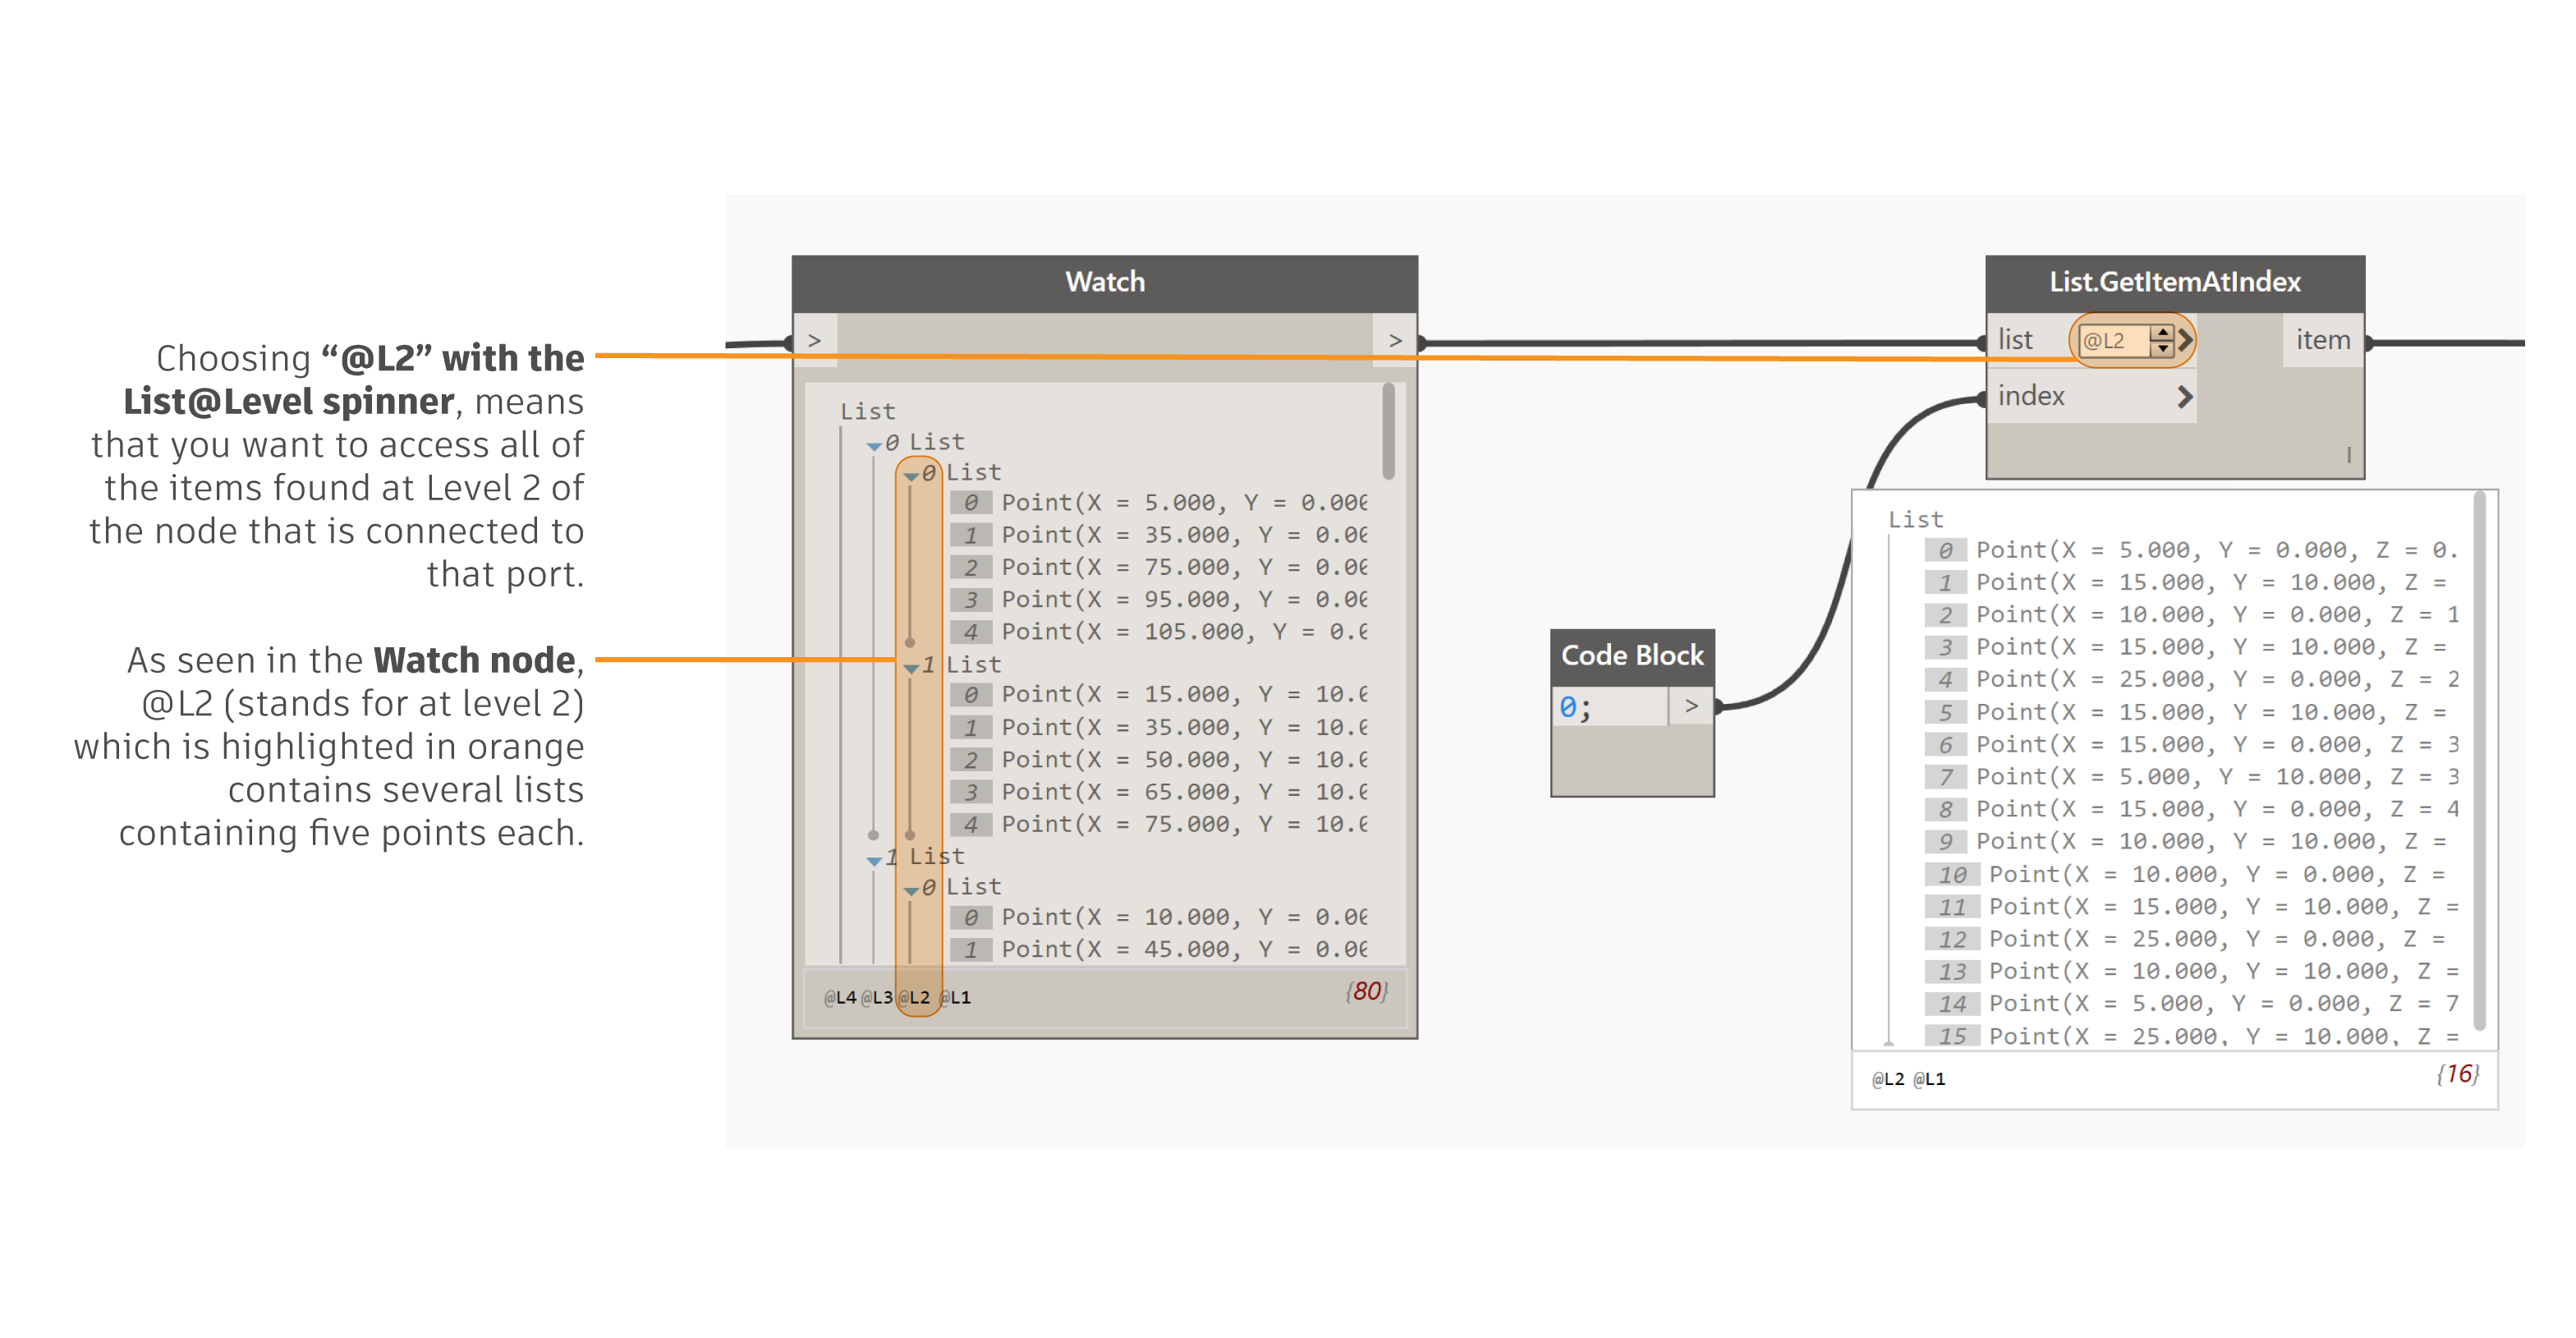
In the example above, “@L2”, which stands for at Level 2, was enabled in the first input port of the List.GetItemAtIndex node. By selecting @L2, the List.GetItemAtIndex node will use the items found at Level 2 of the incoming input. In the Watch node, Level 2 is highlighted in orange and its items are several lists of points. In standard Designscript notation, the items at Level 2 are:
- List[0][0]
- List[0][1]
- List[1][0]
- List[1][1]
- List[2][0]
- List[2][1]
- List[3][0]
- List[3][1]
- List[4][0]
- List[4][1]
- List[5][0]
- List[5][1]
- List[6][0]
- List[6][1]
- List[7][0]
- List[7][1]
Each one of these lists at Level 2 contain five points each. As a result, the List.GetItemAtIndex node will look at each one of these lists at Level 2 for the first item (as specified by the 0 index input) which is great! The node is returning the correct values!
But, if you notice, the items are now just in one flat list! I lost all of my sublists that I was using to organize my data by floor. So, in order for you to not lose that valuable information, we have provided the option for you to keep the list structure of your input. By checking the “Keep list structure” option, you can get all of that organizational data back. See the comparison below where the second group of nodes applies the “Keep list structure” option. A couple of things to note about this option: (1) if your node takes more than one input, you can only keep the list structure for one of your inputs, (2) to determine which input’s structure will be kept, just look for the blue highlight.
So, that’s it. Pretty easy. Try out the List@Level features today and let us know what you think!
 Oh, and a few last things, since List@Level is a brand new feature we don’t have everything worked out. So, here are a few gotchas or things you should know about working with List@Level in 1.2:
- Some nodes do not have the ability to use List@Level since they are either inputs themselves, do not take lists as inputs, or have special UI that prevents List@Level from being applied
- You may get unexpected results when trying to use the “Keep list structure” option with jagged lists
- Using List@Level functionality on the List.Join node may cause unexpected results
- To dismiss the List@Level popup, just click anywhere in the canvas
- If you drag your mouse around the canvas while the List@Level popup is still open, you may see the selected node’s preview bubble appear/disappear unexpectedly.
- “Keep list structure” option will remain selected and the port highlighted even if “Use Levels” is disabled. We will fix this in the future.
- List@Level functionality is available in Designscript and can be called from code block nodes. Due to semantic versioning, the notation on the node UI and in code blocks is slightly different. We will fix this in Dynamo 2.0. So, while in the UI, Levels are called using the “@L” notation. In Designscript, “@L” should be “@-”. For instance to use Level 2 in Designscript for Dynamo 1.2 in a Point.ByCoordinates node, you should write the following:
- Point.ByCoordinates(t1@-2, t2, t3)
- Additionally, you may have noticed that applying “Keep list structure” to your node changes the text inside the List@Level spinner to have two “@”s. For instance, instead of “@L2”, the text changes to “@@L2”. This is because “@@” is the way to indicate how to keep the list structure in Designscript. So, if you want to keep the list structure of the first input of the Point.ByCoordinates node, you should write:
- Point.ByCoordinates(t1@@-2, t2, t3)